
The Musings of a Chocoholic
has provided us with a really great, little tutorial. It's for a bottle cap embellishment and the reason I like this one so much is that it's pretty simple but the result is a very unique embellishment. It can be used as an accent in an altered art project, assemblage art, any mixed media project, a scrapbook or card embellishment, or even jewelry.
Daniele is always tackling and sharing new techniques, which is why I'm a frequent visitor to her blog. Here is her Bottle Cap Tutorial.
1. Materials used: image, bottle cap, alchohol ink, glossy accents, glue stick, foil and punch.

2. Use the back of the bottle cap and cut out image using a 1" punch.

3. Put glossy accents around the rim of the bottle cap.

4. Add a drop or 2 of alchohol ink, I've used rust.

5. Using glue stick, add glue and rub on foil, tearing off foil to get a more distressed look.

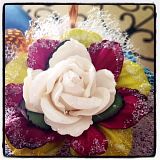
6. Stick image to centre of bottle cap using glossy accents.

7. Apply glossy accents to top of image covering all of image, and then leave to dry (1 hour).

8. Apply foil to the edge of the bottle cap as per instructions in point 5.

I told you this is a great tutorial-and something we all can easily play around with. And look what she did with it!

Be sure to visit The Musings of a Chocoholic where you'll find another mini tutorial for making the card! Thank you so much Daniele.
What's next? You tell me! With 273 friends (thank you!) following, we should be in tutorials for a long, long time. Are you next?


TABBYSPLACE.png)


11 comments:
Yet anther wonderful tutorial thank you I always wanted to know how to do them It's something I havn't tryed yet but as soon as the snow goes I pop down to craftstore... hugs wendy
I love what you did with the bottle cap. I've used them on my artwork before.
Wonderful information! I can't believe the transformation.
Oh how fun! What a great idea. Thanks for sharing!
What a great idea! Thanks for sharing the tutorial!
Angela
This is great, you are so very creative. Thank you for the tutorial !!
Hello Joanne!
Hope you are Staying Warm ! You folks are Really getting the Snow! to say the Very Least!
Thank you for this wonderful Tutorial!
Have a Wonderful Weekend and a Happy Thursday!
Hugs
Jill
Hi Joanne! Thank you so much for the most sweet visit to my blog and I will get back to you on a tutorial! This tutorial was great and I can't wait to try this! Stay warm!!
I have seen bottle caps filled with plastic but not done like this. Easy tutorial to follow.
Hugs Mrs A.
Joanne: I love this tutorial. I've been gonna play with something like this for awhile, so no excuses huh?
I just awarded you the Stylish Blogger award on my blog.....don't hate me, cuz I like your style. tee hee.
The Olde Bagg, Linda
thank you for this tutorial! wonderful information and fabulous creation!
Post a Comment