
Linda, of Random Creativity.
I visited Linda during One World One Heart and commented on a tutorial she offered on her blog and invited her to visit here and check out Tutorial Tuesdays. Fortunately for all of us, she was interested in sharing it......
Grungy Copper Ornament

Gather tools:
Light Weight Copper (cut to desired size)
Stencil
Bone Folder/Burnisher
Stylus
Decorative Edge Scissors
Ruler
Adirondack Alcohol Inks
Alcohol Ink Blending Solution
Felt Blending Tool

Trim the copper sheet to desired size. Cut the copper with a tin snip or old scissors. (Take care, the edges of the copper can be sharp.)

Flatten and smooth copper surface.

Tape the copper piece securely to a padded work surface.
Tape the stencil securely to the copper sheet.

Emboss copper using the stylus to trace around the edges of the stencil pattern.

Trim the edges of the copper with a decorative scissor edger.
They will cut through light weight copper.

Emboss a line down the long sides the copper sheet using a ruler and the stylus.

Draw a row or two of squiggly lines, repeating the pattern of the edger scissors on the ends.

Drop tiny puddles of the alcohol inks on the copper. Use several different ink colors and a metallic mixative.

Spray the ink drops with alcohol blending solution.

Blend the inks and solution until you achieve the desired effect.

Attach the finished copper ornament to your project with your favorite glue or tacks.
Tip: Use trims, Stickles or glitter glue to cover the sharp edges of the copper ornament.

Isn't this an awesome tutorial? It's not difficult and think of all the embellishments, book covers for altered books, pieces for assemblages (and the list goes on), you can make using this technique.
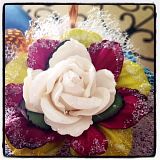
Look at this gorgeous copper tag!!!
 Visit Random Creativity now and enter to win it!
Many thanks to Linda for this very unique tutorial. April's guest artist will be sharing sugar beads with us. I know I'm intrigued...
I'd be happy to feature you and your technique or project on an upcoming Tutorial Tuesday. All it takes is your idea and an email!


TABBYSPLACE.png)


11 comments:
Wonderful tutorial. Thanks!!
Awesome tutorial! Thanks so much for sharing it.
Hi Joanne, It is an honor to be featured on your Tutorial Tuesday. Thank you. I look forward to the up-coming tutorial on sugar beads. XO, Linda
Fabulous tutorial! Off to visit Linda!
The copper is gorgeous and the tutorial is great! Thanks!
Angela
Truly awesome tutorial and beautiful outcome. Thank you.
Linda's tutorial is fabulous--and it's so great that you featured her! She is an awesome artist and amazing person!!! and friend!!!
XO
Fabulous tutorial! Really enjoyed it - I'd never thought of spraying the blending solution before - what a great idea! Off to investigate some more!
Thanks JoAnne!
Hi Joanne,
thanks for another wonderful tutorial!!Have a wonderful weekend.
Hugs,
Marie
Just caught up with this as was away most of last week. The tutorial is very easy to follow. Must have a closer look at how to do.
fabulous tutorial from Linda. I love this kind of crafting.
hugs June x
Post a Comment