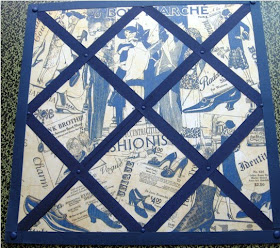
Supplies:
1 12x12” Bon Marche – Graphic 45 Fashionista Line
1 6x12” navy blue cardstock
2 yards ½” navy blue ribbon/vintage seam binding
4 regular size navy brads 9 mini size navy brads
Navy ink
¼” double-sided tape - this is important, nothing works as well adhering ribbon or fabric to paper.
Zip Dry glue - this is one of the best glues to use paper to paper, it won’t cause your paper to warp and like the name it is quick.
Craft knife and a sharp “hole poker” to use on the ribbon.
Work with a good ruler and preferably on a self-healing rotary mat.
Directions:
A. Ink the Bon Marche paper on all four edges.
B. Laying the 12x12 paper flat, adhere a small piece of double-sided tape (DST) along the top left and bottom right sides. (No need to take off the top paper until you are ready to adhere the ribbon.) Center the ribbon into the top left corner diagonally and run it down to the bottom right corner.
Don’t make it too tight but don’t leave any ease. Do the same thing from the opposite corners. You will have a large X.
This is where working on a rotary mat is helpful.
Adhere a piece of DST along all edges at 6”. Run the ribbon from the 6” point on the left side to the bottom middle. Keep turning the paper and do this on the remaining three sides. As you move along the ribbons will cross at the 6” mark.
C. Cut four ½ x 12” strips from the navy cardstock for the frame. Adhere the first strip across the top of your page and the remaining strips one after another, trimming the edges to fit with a craft knife.
D. Using a sharp poker to make holes first insert the mini brads at each crisscross and the regular brads into each corner.

Wow, what a fabulous idea! I love the idea of tucking those small items in. Thanks so much for sharing.
ReplyDeleteGreat idea! I can see other ways to use it too. Thank you for introducing me to Maximum Embellishments, too.
ReplyDeleteJeanie
Congratulations to Sandi for beiong featured here. Greast idea.
ReplyDeleteWishes
Lynne M
What a lovely project - thanks for sharing x
ReplyDeleteSuper fun idea!! I will have to use a smaller version of this is one of my mini albums!!
ReplyDeleteWhat a lovely quick and easy project.Perfect for just anywhere.
ReplyDeleteBoth you and Sandi are great inspiration!
ReplyDeleteThat is a wonderful idea for a heritage page. I really love the idea of being able to tuck all the small items on one page. Thank you both for sharing.
ReplyDeleteGreat idea, thanks for sharing,
ReplyDeleteOh, I love this. Such a clever idea and wonderfully explained.
ReplyDeleteIt's beautiful! Very creative, too. Thanks for sharing!
ReplyDeleteAngela
Fabulous tutorial! Thank you so much for sharing!
ReplyDeleteThanks Miss Sandi, you are a busy bee!
ReplyDeleteHow clever :)
ReplyDeleteSuch a pretty project,love it
ReplyDeleteHugs June
Hi there, I sent my match box off today. I will post pics when Jen recieves it. It was great fun and I can't wait for the next one. ANd thanks for all the free images you post! They are great!
ReplyDeleteAnd what a great project. I will have to give it try one day soon.. Becs
What a great idea, and so useful too!
ReplyDeleteWhat a great project, I have the perfect spot! Please stop by for a piece of pie when you have a moment! Something's always cooking @ OB&CS!
ReplyDeleteGreat tutorial! Thank you so much for sharing!
ReplyDeleteHappy Spring!
Gaby
This is a great project. So creative.
ReplyDeleteJoanne! Thank you again for the opportunity to do your "Tuesday Tutorial" - what great fun. I have randomly drawn for a vintage style RAK - Linda M! Thank you everyone for your kind words and coming over to Maximum Embellishment for a look!
ReplyDeleteHugs!